Radiant
ProtoTwin Radiant is a native offline rendering application that makes it easy for you to render high-quality realistic videos of your physics-based simulations. Digital twins that you create in ProtoTwin Simulate can be rendered easily using ProtoTwin Radiant.
Requirements
Rendering high-quality videos is very GPU-demanding. It is recommended that you use a machine with a powerful GPU if you want to render more than a few hundred frames. Long videos may take many hours or even days to render, depending on the frame rate and length of your video.
You will need to create an account before you can install ProtoTwin Radiant. Once you’ve created an account, you can download the installer from the account page.
Workflow
Described below is a general workflow that you can follow to render videos.
Record Frames
Start by selecting to record your simulation to a sequence of GLTF frames.
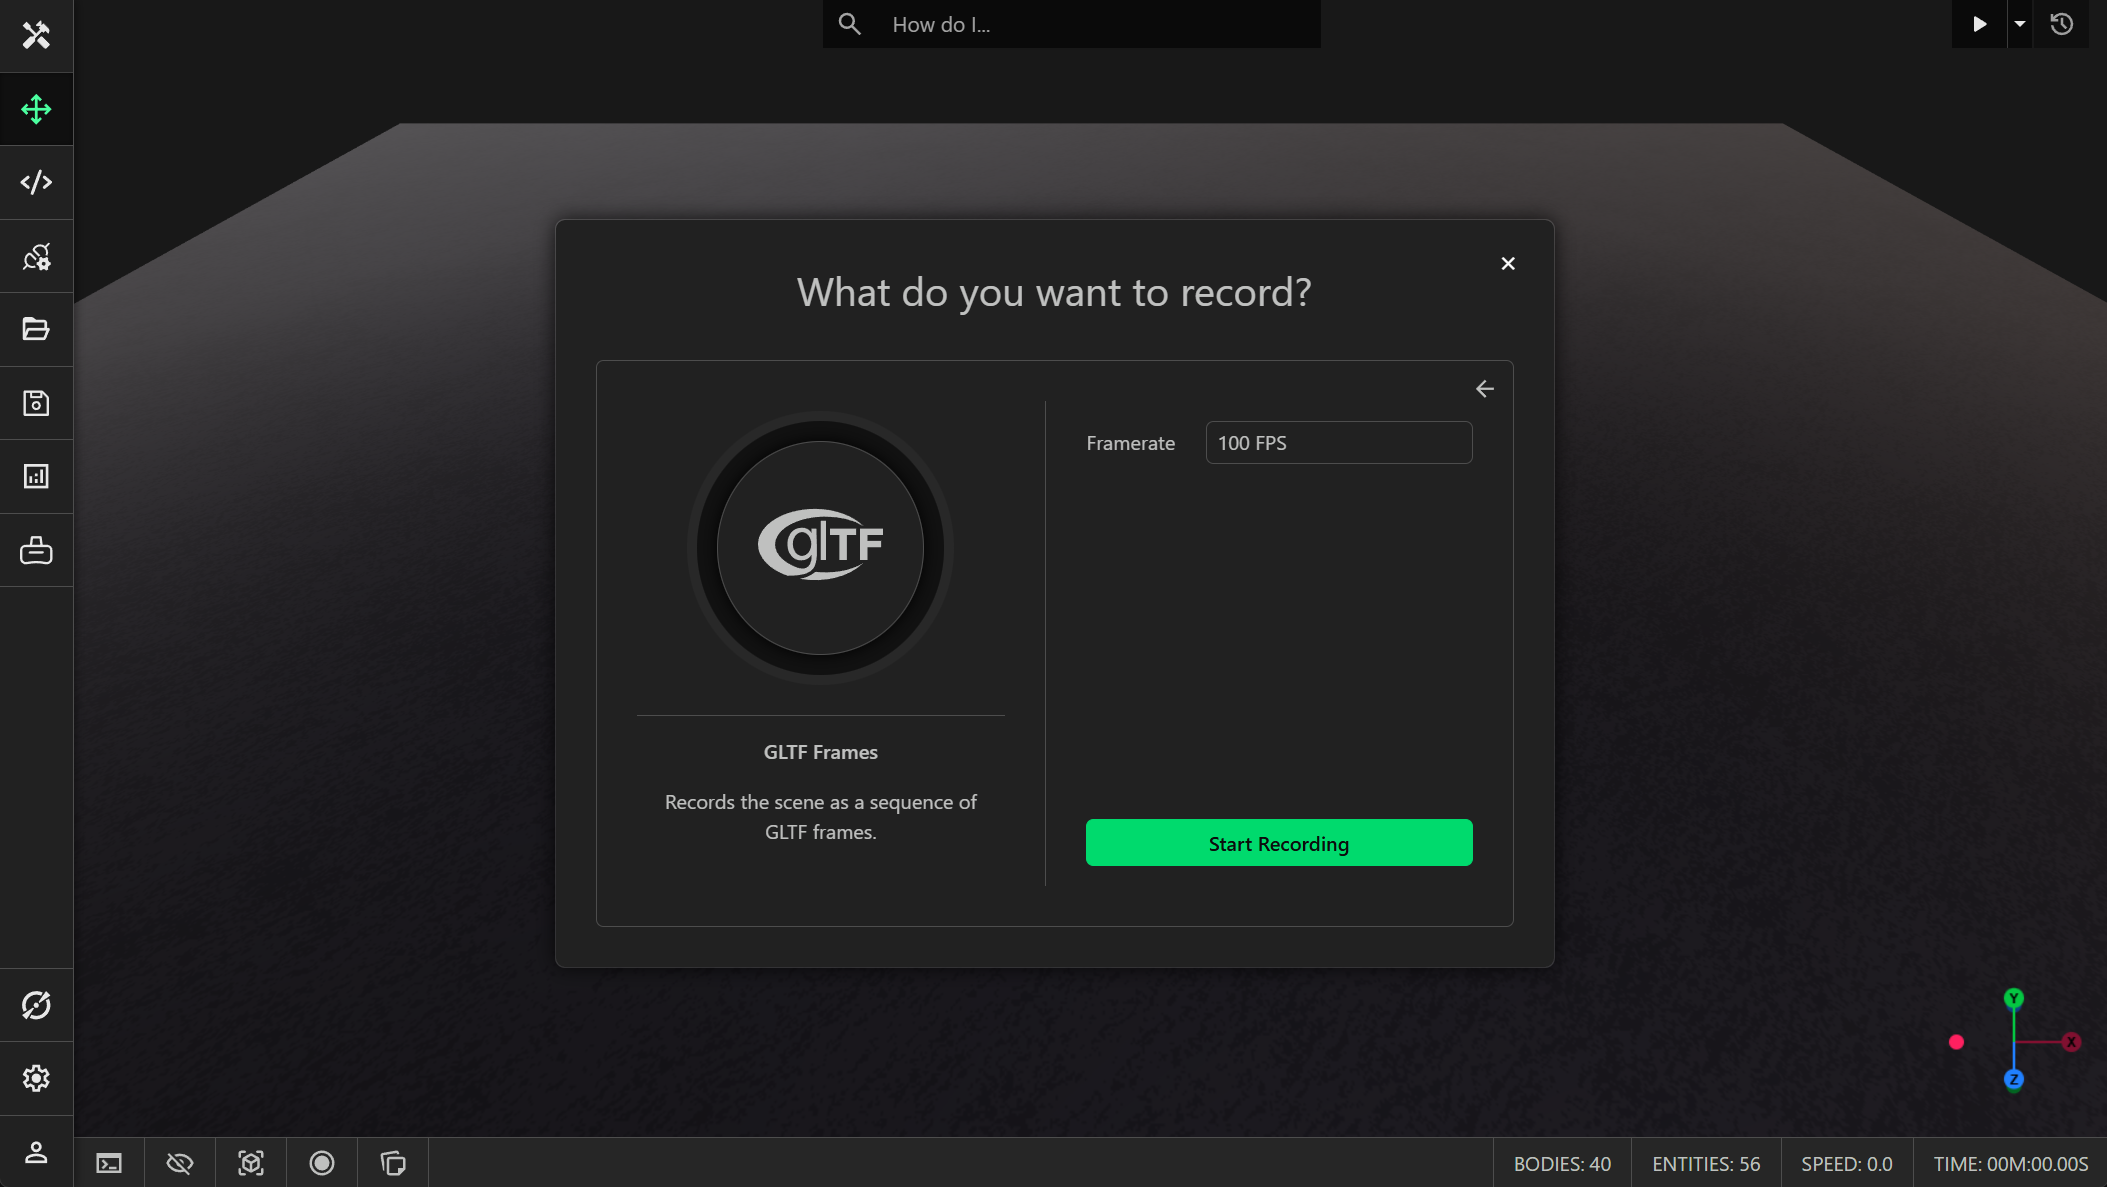
Make sure you choose an appropriate frame rate. If your simulation has fast-moving parts then you may need a higher frame rate in order to capture the smooth motion. Run the simulation and click the stop button in the infobar at the bottom to generate all the GLTF frames and save them to your local drive as a .zip file.
Render Frames
You can now launch Radiant and load the recorded .zip file of frames. Configure the settings to the left according to your preferences.
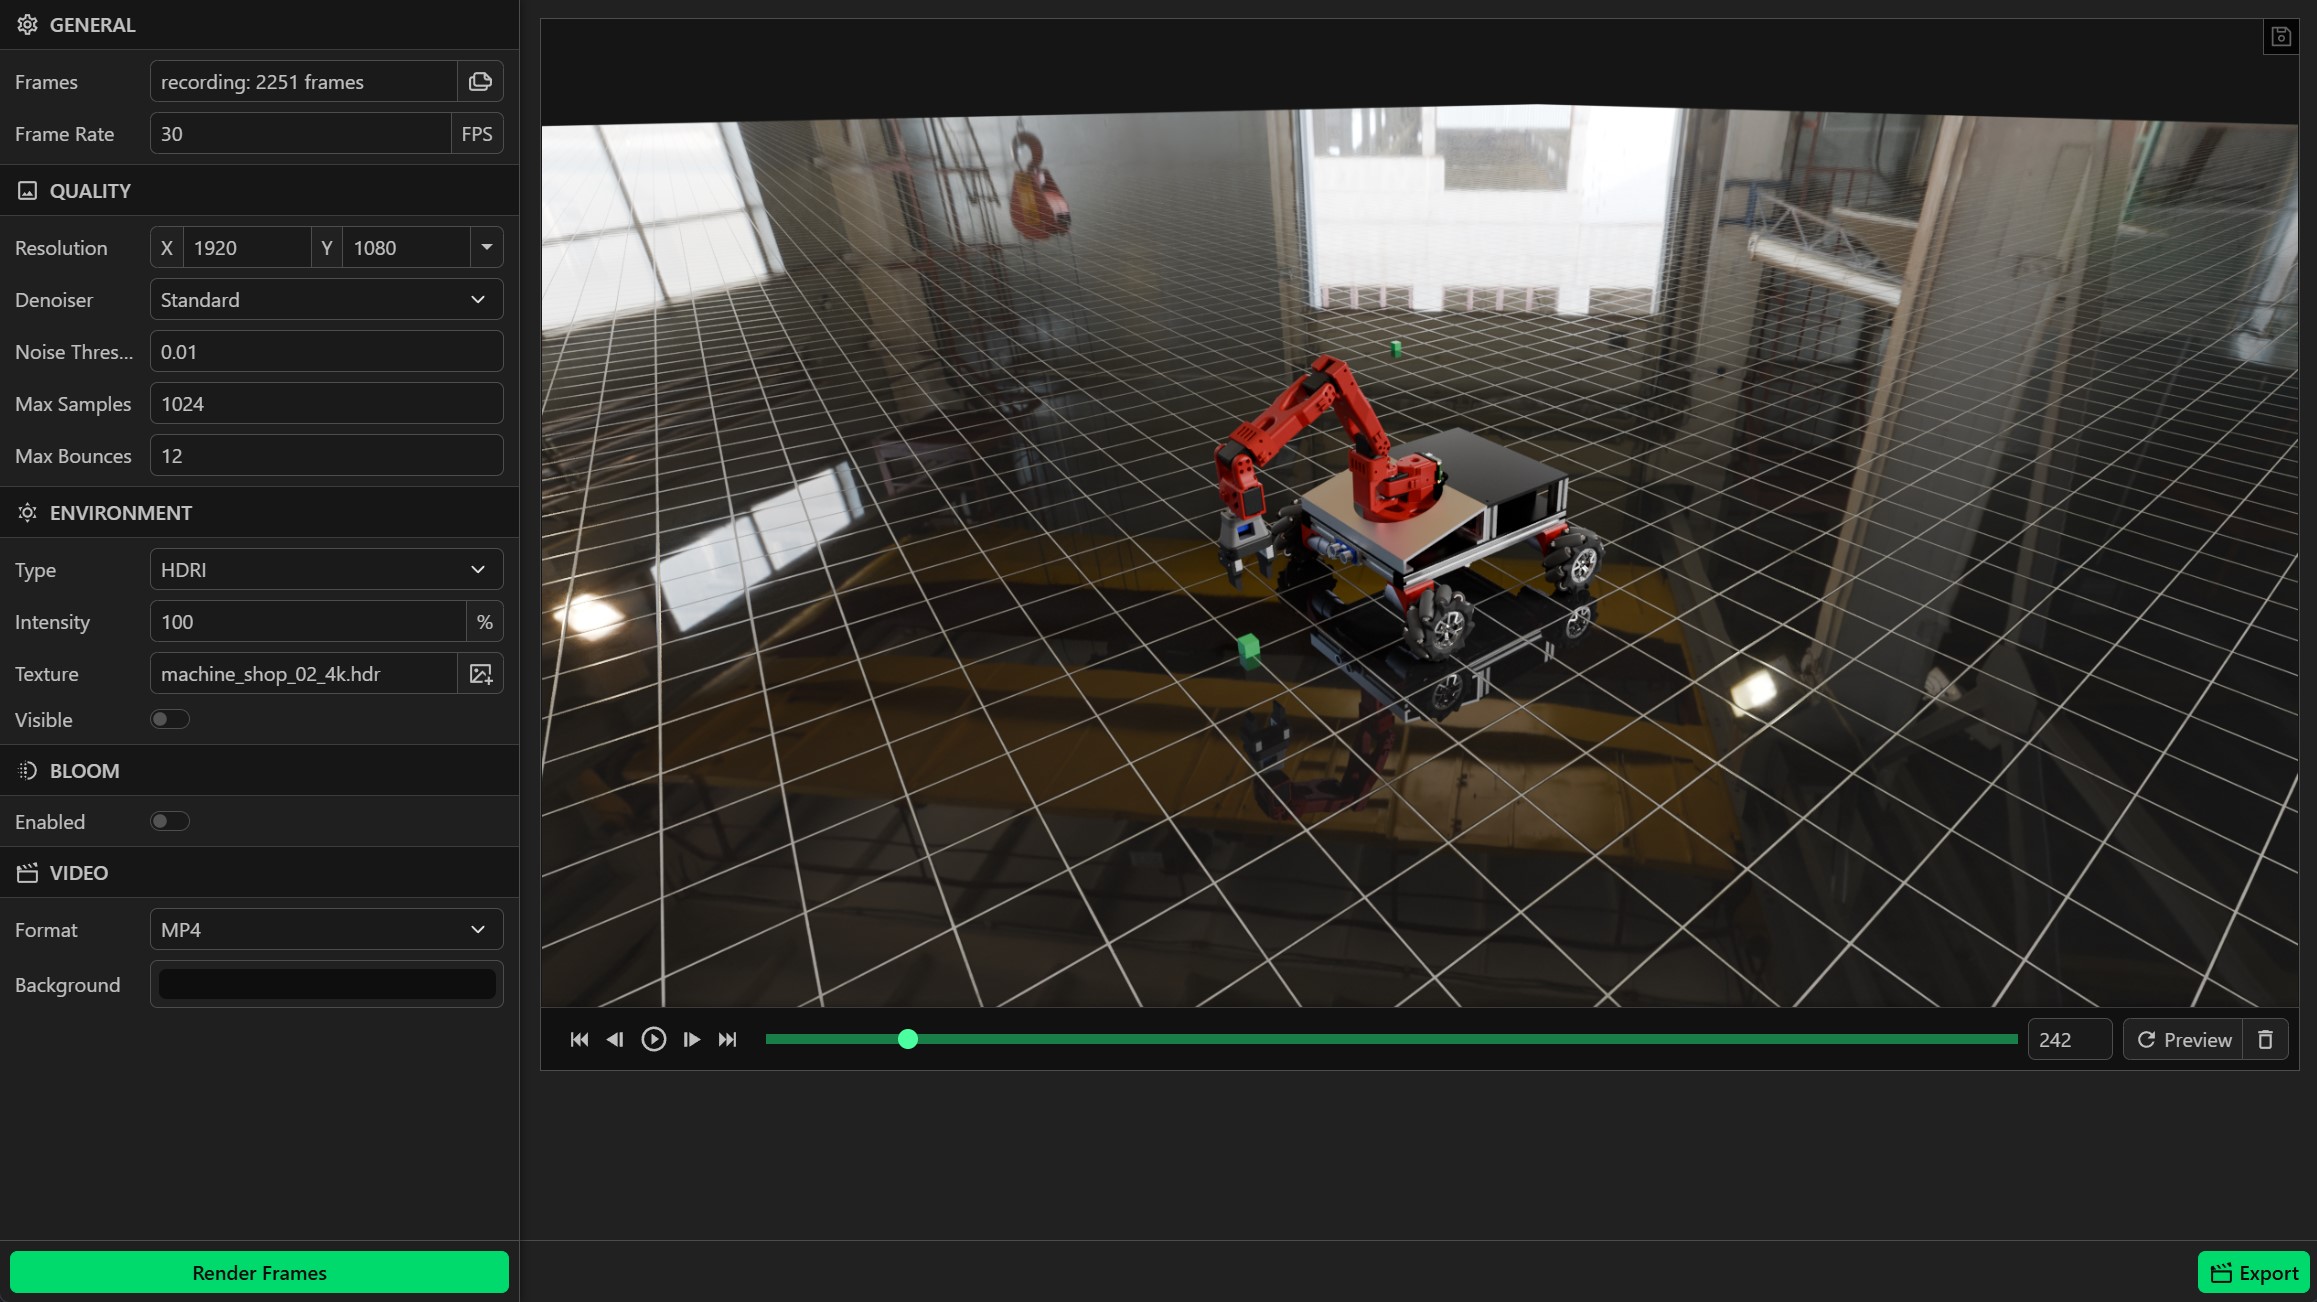
Previewing frames is important to make sure you are happy with the textures, environment lighting, camera movements, etc. You will need to go back and record the frames again in ProtoTwin Simulate if you are not happy with the textures or camera movements. The environment lighting can be configured in Radiant.
You can click the Preview button at the bottom to render a single frame. Once you’re happy with the settings, click the Render Frames button to start rendering all the frames. You will need to wait some time until all the frames have finished processing.
Export Video
After all the frames have been rendered, you can click the Export button to export the video to either an MP4 or WebM file.
Settings
There are a number of settings that can be used to control the quality and appearance of the rendered video:
- Resolution: The resolution for the rendered images. Higher resolutions can capture greater detail, but can take significantly longer to render.
- Denoiser: The denoiser to use after the image has been rendered. The standard denoiser can help to reduce noise. However, if you are rendering with a very low noise threshold and a high number of samples, it may be possible to disable the denoiser.
- Noise Threshold: The threshold used to determine when an area of the image has sufficiently low noise that no more samples are required. Larger values can speed up rendering at the cost of increased noise and reduced quality.
- Max Samples: The maximum number of samples per pixel. Smaller values can speed up rendering at the cost of increased noise and reduced quality.
- Max Bounces: The maximum number of times a light ray can bounce off a surface. Smaller values can speed up rendering at the cost of reduced detail and increased noise on reflective and translucent surfaces.
- Environment Type: The environment lighting to be used. None provides no environment-based lighting and is fast, but offers less interesting reflections. Sky procedurally generates outdoor lighting conditions. HDRI allows you to specify an environment texture, which can provide the most interesting reflection and lighting conditions, but is more costly to render.
- Environment Intensity: Allows the amount of light provided by the environment to be increased or decreased.
- Environment Visible: Whether the environment sky or HDRI texture should be visible in the rendered image. If disabled, the background will be transparent or replaced with the specified background color when exporting to MP4.
- Bloom Enabled: Enables a bloom filter, causing light/bright areas of the image to glow.
- Bloom Threshold: Used to determine how light/bright a pixel must be for it to contribute to the bloom filter.
- Bloom Strength: Controls the strength of the bloom filter. Larger values will cause the glow to be more intense.
- Video Format: The format to use when exporting the video. MP4 has excellent compatibility, but does not support transparency. WebM is a modern format for the web with good browser compatibility and supports transparency.
- Video Background: The background color which is used to replace transparent pixels when exporting to MP4.